My office offers fresh fruit every week and this week the fruit bowl is loaded with mini seedless tangelos, and fat, heavy naval oranges, both deeply orange and tangy.
I cracked a tangelo open and peeled it, trying to peel it in one long peel, and the aroma wafted up.
Suddenly I was taken back to my first home where we had a navel orange tree. I spent many fond years on the teak bench my father built on the edge of the patio under the shade of the orange tree. I would perch there to eat the bright juicy fruit still warm from the sun. We almost lost the tree one year because the baby rabbit my sister found on the edge of the high school’s wilderness area (a space with examples of each California ecosystem, built by my sister and other students) developed a taste for the orange tree bark and almost girdled it. We weaned him off his destructive habits by feeding him regular handfuls of orange and lemon leaves as a treat.
My mom used to make fancy cakes decorated with chocolate leaves using the orange tree leaves as a mold. I would be sent out to the yard to pluck young, perfectly sized and smooth orange leaves, and would be tasked with carefully washing and drying them. Once they were perfectly dry we would paint them with tempered dark chocolate and chill them, and later, slowly, peel off the leaf to reveal a perfect chocolate form.
When my mom remarried, we picked orange blossoms and created fancy rings of ice adorned with the blooms to float in the punch bowl for the wedding reception. Grandmother sadly needed to be moved to the East Coast to live with my aunt, so we stripped the tree of oranges to ship back with them, a last taste of California and nostalgia.
These days, living in my current apartment high above the streets, I keep a copy of Cross Creek by the bathtub for languorous bubble bath reading, and recall the scent of orange blossoms floating in the night. I long for that orange tree, as I buy outrageously priced organic citrus from various places and slice long curls of the peel to drape over the rim of my Negroni at home, and then eat fat wedges of the cut orange the next morning. They never seem to taste quite as heavenly as the one in that childhood home though, the memory of oranges is stronger.
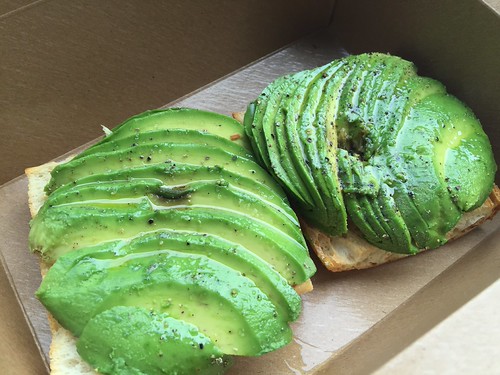
I visited the Ferry Building, as I often do, and tried out one of the most outrageously expensive avocado toasts in the city at Frog Hollow. Admittedly, it was divine. The avocado was perfectly ripe, the bread had the perfect chewiness and toasted not too hard to become too difficult to bite through, causing a cascade of luscious avocado slices to slide off onto your black pants. A hint of garlic overlays the bread, and the entire toast is dappled with salt, pepper, and olive oil.
This beauty comes in at $10.99.
While it is awesome to be like one of the cool kids and fork out two fins and a buck for someone else to make me lunch, I would rather reduce my wallet at the market and shop for the ingredients and make avocado toast myself.
Let’s do the math.
Grocery Store cost ingredient outlay
At home per toast cost
Acme Herb Slab
loaf = 4 servings
4.99
1 serving
1.25
Avocado
each
1.50
1 avocado
1.50
Stonehouse olive oil, house blend
liter = 67 Tbl.
14.00
1 Tbl.
0.21
Garlic
head = 10 cloves
0.96
1 clove
0.10
Maldon salt
box = 8.5 oz
5.99
1/2 tsp.
0.06
McCormick’s black pepper in grinder
grinder = .85 oz
4.29
1/4 tsp.
0.02
Total
31.73
3.13
I used Instacart to price out the ingredients at Whole Foods, while knowing that if I shopped at the farmer’s market or at the Ferry Building I would have received a discount for paying cash for the bread, and the other ingredients can be found cheaply depending upon which farm you source the avocados and garlic.
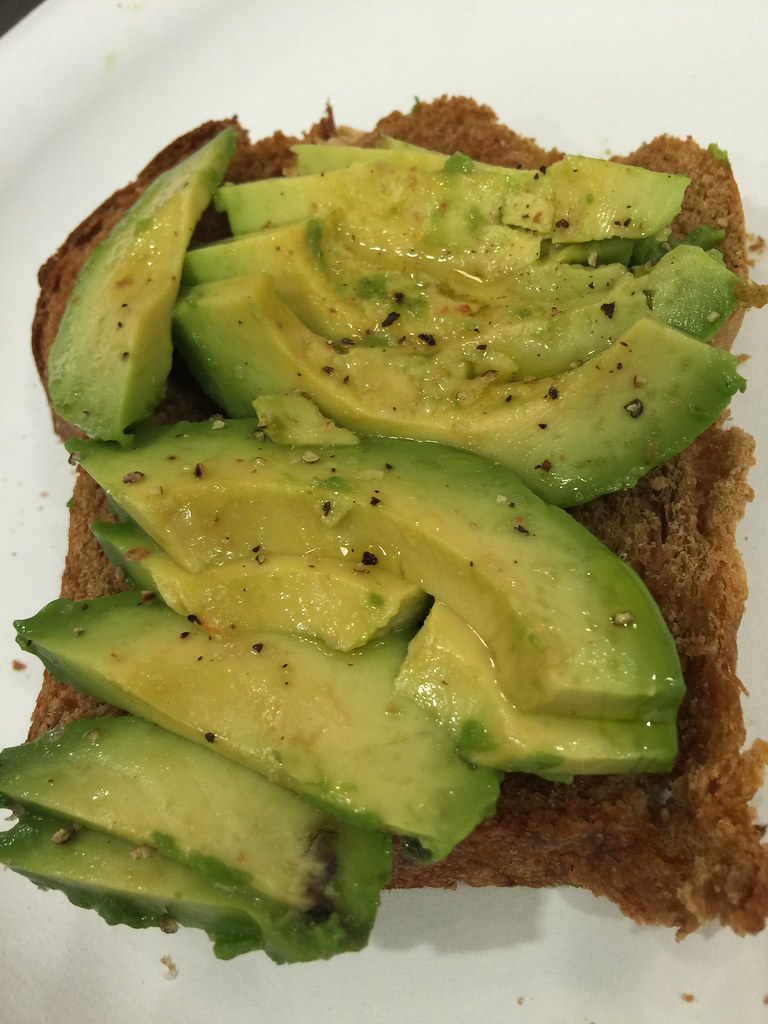
Last Saturday at the Ferry building I bought a loaf of Marla Bakery’s molasses oatmeal bread ($5), a head of garlic ($.25), and two avocados ($3), and made avocado toast at work on Monday. This delay was necessitated by the ripeness of the avocados.
If you haven’t tried Marla’s molasses oatmeal bread as toast you need to rectify this immediately. I do feel slightly ashamed for not baking my own oatmeal molasses bread, as I often do, but I had a busy weekend. I used salt, pepper, and a small bottle of olive oil from the office kitchen and the toaster and made this:
I was in a hurry and didn’t take the beautiful care to arrange the avocado like the staff at Frog Hollow, and my slice of bread got a little trashed during my morning commute on MUNI, but nonetheless, it tasted fantastic and I was the envy of my boss and coworkers. And I saved $7.86.
The only vaguely tricky part is getting a ripe avocado, so I recommend visiting a farmer’s market and asking the farm to help you pick an avocado out. They can advise you when it will be ripe to eat, and usually they are spot on.
My favorite Saturday activity, when I don’t have a pajama day, is heading to the farmer’s market with a friend to shop and to have a little something tasty for brunch or lunch.
We stopped at the Italian butcher first, Guerra’s Meats, where I scored a fat ribeye, breakfast sausage, some cheeses and milk, for another $30. I like getting my weekend protein first, then filling in with vegetable and other items from the el cheapo farmer’s market.
This weekend I spent $20 at the farmer’s market, including my fantastic huarache el pastor lunch. A huarache is a bean filled masa dough pancake, shaped like a football, and topped with something meaty with the perfect amount of salsa, crema and a handful of chopped cilantro. You can buy them at La Palma Market on 24th Street if you don’t go to the Alemany farmer’s market.
A huarache was the perfect lunch, leisurely nibbled while sitting on a tiny clear spot of a loading bay next to a nice farmer’s truck. It was good to rest a bit after doing all of our shopping and to kick our heels against the back of our cement perch like we were little kids again. For some odd reason a diet soda tasted awfully nice but as it was a rare treat for me I just enjoyed it (mostly) without guilt.
My new knitted string market bag performed superbly, I could not believe how much it held, and how nicely everything stayed. It was stuffed with broccoli, obscenely large leeks, the freshest green onions I had ever had the pleasure to hold, pale green zucchini and yellow ball zucchini, a huge bunch of mint and rosemary, crimini and ugly shiitake mushrooms, enormous yet light sourdough English muffins and cranberry walnut bread. I should have taken a picture of it stuffed and outstretched but still comfortable and incredibly stylish on my shoulder.
I have enough food for breakfasts, lunches and dinners for the entire week and probably into the next week, supplemented with more protein from my freezer.
After unloading my friend’s groceries at her place and doing some menu planning while petting her pretty cats and slugging back the necessary glass of red wine, I headed home and started cooking.
My huarache was quite filling but around 4:30 pm I made a snack of Humbolt Fog cheese and the cranberry walnut bread. With my pollinosis the cranberries were a little troublesome but not enough to dissuade me from eating the bread. I started on a pot of red cooked pork belly.
The pork belly was trimmings from the Mangalitsa pork I bought a while back. I had to trim the raw pork belly so that it would fit in my brining bags and the excess, uneven pieces were about 2 pounds. The red cooking, or a slow braise in a soy, Chinese rice wine, ginger, spices and garlic broth, is a traditional way to cook pork belly and other fatty meats. It couldn’t be simpler, I put all of the ingredients in my 5 quart pot, brought it to a boil, covered it and simmered it until the meat was super tender. The aromas it generated as it simmered were amazing, I felt full just by being in the kitchen.
After 2 1/2 hours and another 10 minutes of cooking on high to reduce the sauce I poured off the fat and decided I was too full to eat anything so into the fridge it went!
Sunday morning I dined fabulously well on a huge toasted sourdough muffin, one side buttered, one side smeared with raspberry jam, and a handful of tiny Italian breakfast sausages.
Meantime, I cooked the ribeye in some bacon fat from the red cooked pork belly and sliced it thinly for work lunches. The bok choy I brought home from work on Thursday was quickly steamed and given a light dressing of oyster sauce and chilled. The pale green zucchini and yellow squash were cut into planks along with some onion, the rosemary and some lemon zest and olive oil and roasted until just crisp-tender. They were packed into a tub for the fridge. The mushrooms were sliced and browned in my biggest and yet too small skillet, the last slosh of port in the bottle went in along with some dried herbs from last summer and a bit of butter. This was packed up with the sliced steak.
Getting quite tired of the kitchen by now, I steamed some basmati rice and wondered what happened to the bag of jasmine rice I bought a few weeks ago, a desultory search in the pantry and auxiliary pantry bags did not yield it. Huh…. I made myself a little bento lunch of rice, the jade green bok choy and the red cooked pork belly.
Later in the the week I’ll roast the broccoli for lunches and make a leek and bacon pasta. I might make a pizza one night with some of the zucchini. I also have some frozen ground pork which would be wonderful stuffed in the ball zucchini.
It was really fun prepping good food for the week and I enjoyed my domesticity. I also washed up the kitchen and dumped the trash and did some hand laundry. The vacuuming didn’t get done nor did the dusting but I will fit that in some night when I don’t have an extracurricular activity.
I sunk into my comfy Martha Washington chair with a glass of Sauvignon Blanc and some knitting and mindless television before going to bed. It was a fun and productive weekend, nourishing to the body and soul.
3 lbs. of fresh pork belly, cut into cubes
3 pieces of palm sugar or 1 1/2 ounces rock sugar
3 pieces of whole star anise
3 cloves garlic, peeled and crushed
1/2 tsp. five spice powder
3″ piece of fresh ginger root, sliced into 1/2″ medallions – no need to peel
2 T light soy sauce (this is less salty than regular soy sauce)
3 T dark soy sauce (I use Tamari)
1/4 cup Shao Xing wine – or a white vermouth
2 cups chicken broth – low sodium is best 1 bunch of green onions – whole
Place the pork and all of the other ingredients into your heaviest pot with a lid or a Dutch oven, my 5 quart Le Cruest pot was perfect for this dish. Bring everything to a boil, stir and cover with a lid. Reduce the heat to low and simmer for 2 1/2 hours. Test the pork, it should be very, very tender when pierced with a fork.
Remove the lid and simmer over medium high heat for 10 minutes, stirring, to thicken the sauce. Pour off the fat and remove the ginger, anise and green onions and compost them.
I wanted to share an article I wrote for a friend’s site a few years ago about this time of year, it is one of my favorite recipes still.
As winter recedes and Spring takes her dainty steps forward we yearn for Spring flavors but are limited to winter produce. Sometimes, the best solution is to simplify and intensify the brightness of our chilly weather vegetables. In this mood, I focused on the bright green sprightlyness of the humble leek.
I found an enormous specimen at the market; heavy, fatter than the circumference of my wrist, squeaky fresh and deeply oniony. I sliced it thinly and washed it well in icy water, separating the slices into lacy rings. Some I scattered on a small baking tray, drizzled with fruity olive oil and Maldon salt, to be roasted until crispy in a slow oven.
In my favorite soup pot I melted a knob of butter and tossed in the remaining mound of leeks and a sprinkling of salt. They caramelized slowly and filled my little kitchen with the sweet onion aroma unique to the leek. A fat russet potato was peeled and diced and added to the pot along with a few pints of cold filtered water. An aromatic local Bay Laurel leaf was tossed in, bounty from a recent hike, the tinyiest dash of earthy cumin and a grating of a fresh nutmeg from a friend’s vacation in Jamaica.
By the time the soup had finished simmering, until the potato was tender and the leeks succulent, the leek rings had finished baking and were lightly golden and crispy.
A few quick bursts of the immersion blender in my soup pot and my dinner was ready.
I plopped into the bowl of creamy, soft green soup a dollop of tangy sour cream, a few fat curls of sheep’s milk Pecorino and a tangle of crispy leeks. Each spoonful of this humble potage yielded a different mouthful of the essence of leek and a promise of spring.
Creamy Leek Potato Soup with Crispy Leek Rings
The creaminess of the soup comes from the potato and the addition of
sour cream at plating. This recipe is also wonderful without the dairy for a vegan entree or starter. Also, best of all, this recipe is gluten free!
1 large or 2 medium leeks, thinly sliced, including the tender green section, 3 cups
2 T olive oil, divided
1 T unsalted butter
1 tsp salt, plus more for sprinkling
A few grinds black pepper
1 large russet potato, peeled and diced, 2 cups
1/2 bay leaf or one small leaf
1/8 tsp ground cumin
1/8 tsp grated nutmeg
4 cups water
Sour cream
Sheep’s milk Pecorino, shaved into curls using a sharp vegetable peeler
The Soup
In a soup pot melt the butter with the rmaining 1 T olive oil and
saute the remaining leeks on medium heat until tender. Add potato,
water, salt and pepper, nutmeg and the bay leaf. Simmer until potato
is very tender, 20 – 30 minutes. Remove bay leaf. Purée until creamy
but the soup still retains some texture.
Crispy Leek Rings*
Preheat the oven to 250 and line a baking tray with parchment paper.
Wash the leeks well in cold water in a large bowl and separate them into rings. Repeat until no dirt remains in the bowl and spin them dry in your salad spinner. Sprinkle enough leeks onto the tray to cover it, and drizzle with 1 T olive oil and sea salt. Bake for 30 -60 minutes until golden brown and crispy.
(* Thank you to Molly Katzen for sharing her original recipe, Leek Chips when we were chatting on Twitter one night.)
To Serve
In each bowl, add a fat tablespoon of sour cream, a few pieces of the
Pecorino and a good heap of crispy leek rings.
Serves 4 with some squabbling over the remaining crispy leeks
I made a victory pie, a blackberry pie to enjoy on Superbowl Sunday. Sadly the 49ers lost (even though they shouldn’t have but I don’t want to get into *that*) the pie was still a win because it was my own victory.
I have long had an irrational fear of pie crust, any kind of rolled dough just doesn’t work for me. I never get the consistency of the dough right, it sticks, it rips and tears, it bakes up wrong, it tastes wrong or pasty, it’s just stupid and scary. For years I have struggled with my hot, not made for pastry, hands and have grumpily given up to buying premade pie crusts and hated them.
Meanwhile my mOm bangs out perfect pie crusts with her elegant, cool hands like she’s making a bed, smoothing out the pastry with effortless strokes. I have watched her and helped her year after year and I’m still a failure.
Then a great lady in town started her handheld pie business. Natalie Galatzer of Bike Basket Pies delivered her mini sweet and savory pies using her cute bicycle and the pie crust was the bomb. I met her when I was doing culinary tours during The Great Unemployment. I couldn’t really afford them but loved the samples she gave during the tour.
When I got a job I would order her pies for myself and then I started ordering them for the office and we all scarfed them up marveling at her great crust and divine fillings. How on earth did she make her pies so well and make so many of them? Practice obviously, and a great recipe.
When she stopped her business due to exhaustion and burnout I was glad for her for taking a rest and selfishly a tiny bit sad because how could I possibly live without her Shaker lemon pies? But then, a fabulous email arrived! Natalie had written a recipe booklet! It is probably the most adorable recipe book I have ever seen, the illustrations are so adorable and really capture the joy of Bike Basket Pies. The instructions and recipes are well written and explained and are a joy to use.
But I was still afraid. Then the Great Allergy/Intolerance arrived and fruit was banned from my life, along with many things I loved, nuts, potatoes, eggs, who all knew what else. The doctor still doesn’t know why but one day I could eat raspberry jam, then cherry, then walnuts, then fresh berries (but not strawberries) and the occasional potato chip. This summer I ate about six pies, mostly blackberry, and life was good again.
Last year Natalie announced she was teaching a pie crust making class. I had to go! With a very gimpy ankle I got to the darling Pot and Pantry for her class and made pie crust. It was great, we all had to make a batch and it felt good. I froze the pie crusts from the class since I had yet to go grocery shopping alone.
In early February, after a month of heinous flu and secondary sinus and ear infections, I made it to the farmer’s market with D___ and bought great vegetables and $15 of blackberries and Buddha’s Hand citrus. It was fantastic to shop without a cane and not feel so petrified of being knocked over. I was weak as a jellied eel after a long fever but the sunshine felt great. The moment I got home I went hope to bed and slept for 3 hours. I sugared down the berries though before going to bed for the evening and resolved to bake a pie for the Superbowl.
On Superbowl Sunday I made breakfast and had a nap and tried to knit but that didn’t work, too tired still, but I did get up to make soup from all my vegetables, a minestrone of sorts, and to roll out the pie crust.
I was nervous but just did it, using a Silpat on my kitchen table. It rolled out pretty nicely, cracking here and there but it went okay! I made a rustic pie/tart using a tiny tin, just enfolding the giant berries inside the dough.
I brushed the crust with milk and a generous sprinkling of coarse sugar, and just remembered to add a pat of butter on the fruit. Into the oven it went.
The juices were thick and bubbling, the crust was nicely browned, it smelled good. I was excited.
The game was sad but I thought consolation by pie would be nice. It was better than nice, it was perfect. The 49ers should have won that game but it cut as keenly because the pie was my victory.
The crust was crunchy and yet flakey, it held together, the fruit was delicious and not too soggy or sweet, it was just perfect. I still have one crust left to make a savory pie this week, greens and goat cheese I think or perhaps a winter squash. I can make pie now!
In just about every high end bar in San Francisco this time of year you will find padron peppers on the menu.
Padrons are mostly mild frying peppers, sautéed until blistered and limp then showered with sea salt and eaten while warm with your fingers, preferably sipping something high octane.
I saw mostly mild because there is always one sneaky pepper that is h-o-t, zippy enough to make you yelp and throatily say, “Whoo!” and reach for your glass. What clever bartenders, eh? Round two coming right up.
Padrons are also nice snacks before dinner at home or for lunch with goat cheese and crackers to quench the heat.
Today for lunch I did just that, I warmed up my skillet to medium high, sloshed in a bunch of olive oil and sautéed the peppers for a few minutes.
Spooned out onto a plate to cool a minute and sprinkled with Maldon crunchy salt, the padrons glisten invitingly, begging to be picked up by a tiny stem and chomped in one bite.
Summer in San Francisco decided to not show up this year (again) and fall is decidedly here. I am pretending that the beautiful clear weather outside equates to Indian summer and that the balmy air I feel isn’t coming from the radiator.
Happily for us fog-bound people we still have an abundance of summer vegetables coming in from the farmer’s markets. It was quite the treat to see a fat, tissue wrapped, perfect eggplant and the last of the heirloom tomatoes in my produce box and a few squash – pale green fat and stubby zucchini varieties – and pretty red bell peppers.
(no comment…)
My mind instantly flashed to a new porcelain baking dish my dear friend A___ gave me for my birthday. I am quite partial to Royal Worcester and the beautiful harvest fruit design is one that makes my heart sing. It is an inherited passion. It is also the perfect size for the quantity of vegetables I had on hand and was time for it to be christened with a beautiful eggplant and squash gratin, so I invited A___ over for dinner.
While A___ and I sipped red wine and caught up on the past few months, I sliced the eggplant and squash. The eggplant was briefly fried in a touch of olive oil in my non-stick skillet and the squash was liberally sprinkled with salt and set out to drain in a colander in the sink. As the browned eggplant came out of the frying pan I stacked up the floppy slices on a clean cutting mat to rest briefly. In between flipping the eggplant around in the frying pan and drinking wine I quickly minced up a fat shallot and grated a clove of garlic and tossed them together in a small bowl. The bell pepper was thinly sliced and set aside in a pile next to the cooked eggplant, and several of the tomatoes were roughly chopped and set out on paper towels to dry out a bit. The preheating oven warmed the room, as the wine and conversation warmed our hearts.
Finally the eggplant was done frying and the salted squash had exuded some liquid and had drained sufficiently. I began an assembly process in my new pretty dish.
I laid down a layer of eggplant in slightly overlapping circles, then tomato, a sprinkle of the shallot/garlic mixture and bell pepper. I topped this with salt and pepper and about half of a 4 ounce log of goat cheese flavored with lemon zest. Honestly it was all that the grocery store had that day and I am very happy about that now.
I repeated the process until I ran out of vegetables and cheese. The final coup de grace was fresh mozzarella, sliced thickly and the discs spread over the top of the gratin and finished with a dash of Maldon salt and a few grinds of pepper.
It slid into the oven while we sat around munching on those crazy bright green Spanish olives and some Rainforest crackers. We talked over all the goings-on over the past few weeks since our last dinner, opened another bottle of wine and relaxed in the perfumed air of the Roost as the gratin bubbled, sizzled and melted under its soft blanket of gooey cheese.
Finally the timer went off and then began the torturous wait for the gratin to cool and firm enough to be scooped out of the pan. We admired the beauty of the gratin and completely forgot to take pictures!
Sometimes it is just nice to enjoy the company and enjoy the food without having to wait to photograph every step and every spoonful, it is called living in the moment, and we did just that.
Despite our precautions of draining the tomatoes and salting the squash the gratin was still a bit watery, but the leftover gratin the next day had completely absorbed the liquid which makes me think I should have made this dish the day before my pal came over for dinner!
The flavors of the vegetables really shone and the touch of lemon zest in the cheese was wonderful. The best part, of course, was the richly browned cheesy mozzarella blanket covering the dish and we fought like pumas over bits of the cheese.
(a version with potato)
Eggplant and Squash Gratin
1 eggplant, sliced thinly
1/2 pound zucchini, sliced thinly lengthwise
1/2 pound tomatoes, sliced thickly
1 red bell pepper, cored and thinly sliced
2 shallots, finely chopped
2 cloves of garlic, minced or grated
4 oz goat cheese (I used goat cheese with lemon zest, if you cannot find this add 1 tsp of grated lemon zest)
6 oz fresh mozzarella, thickly sliced
olive oil
salt and pepper
Preheat the oven to 400 F and oil a baking dish with olive oil.
In a skillet, heat a few tablespoons of olive oil and fry a few slices of eggplant at a time until they are browned. Set aside.
In a colander, arrange a layer of sliced zucchini and salt them well, and repeat; let the squash exude liquid and drain for 30 minutes or so. Pat the slices dry with a paper towel and set them aside.
Arrange the tomatoes on a paper towel to drain. Mix together the bell pepper slices, the shallot and the garlic in a small bowl.
To assemble, lay down a layer of the eggplant, followed by the squash, then tomatoes then a sprinkling of the pepper/shallot/garlic. Sprinkle with salt and pepper, and cover with slices of goat cheese. Repeat until you have used up all of the vegetables and cheese, and top the final layer with the mozzarella. Add salt and pepper to the top of the mozzarella.
Bake for 40-45 minutes until all of the vegetables are very tender and the cheese is browned. Let sit 15 minutes to allow the gratin to firm up. Better if made the day before and brought to a bubbling temperature in a 300 F oven for 20 minutes.
Serves 4 as a main course or 6 as a vegetable side.
This is a very forgiving dish, if you don’t have bell peppers or want to substitute an Anaheim chile or add potatoes anything goes!
(Moray eel potato)
Feel free to play around! I have also made this with smoked fontina as the top cheese and mozzarella as the “inside” cheese.
Lately I have been buying wonderful T-bones from 4505 Meats, both beef and pork cuts. Their email newsletter advertises from time to time specials on aged grass-fed beef or local pasture-raised pork cuts from a whole animal that they age and butcher themselves. The meat quality is divine.
But when one is presented with a 3″ or 4″ hunk of steak or monster pork chop, how on earth do you cook it?
Here’s my foolproof method that turns out meat that is perfectly cooked from edge to edge with a nice crispy sear on the outside.
I must say that this method is completely counter-intuitive to what I have been taught when preparing and cooking a steak but it is so simple and never fails.
Step 1: Bring Meat to Room Temperature and Season
Here is the two-pound beef T-bone from 4505 Meat that I cooked a week ago – what a massive steak!
It was about 4″ thick and a full 11″ long hunk of luscious, 28 day dry aged grass-fed beef. Talk about gorgeous meat!
I patted it dry and placed it on a plate and seasoned it with a dry rub. My dry rub had powdered smoked red onions and a dried chipotle from Tierra Vegetables, a powdered shitake mushroom, all of which I blitzed up in my food processor, then added sea salt, pepper, rosemary and thyme from a friend’s garden and some paprika.
For the pork T-bone that I cooked on Sunday I used a dry rub that came from Golden Gate Meats, which had dried onion, paprika, orange peel, sage and some other herbs. I added salt and pepper to the pork steak first, then the dry rub.
The meat came to room temperature snuggled under its savory seasoning for about an hour, meanwhile I preheated the oven to 275 F.
Step 2: The Slow Roast
Once the oven was hot and the meat was at room temperature I placed it on my roasting pan and anointed it with some olive oil and bunged it in the oven. I set the timer for 45 minutes and started some potatoes to roast in my convection oven.
After 45 minutes I checked the temperature of the meat with a digital thermometer. I was looking for 125 F for the beef which is for a medium rare steak. For this particular steak I roasted it for a total of 55 minutes.
The pork T-bone also weighed 2 pounds and roasted for 65 minutes until it reached 135 F.
Step 3: The Sear
I heated up my largest skillet under medium high heat and added a good splash of grapeseed oil and watched the oil until it started to shimmer. Using tongs I placed the steak in the pan to sear quickly on all sides, including the fat side and the bone side. It took about 2 minutes per side to get a nice deep brown.
Here is the pork T-bone getting its sear. Can you see the thick fat ring? It was 2″ thick of glorious pure white fat. Later I removed the fat and rendered it down for other nefarious purposes.
Once the meat had achieved the deep golden brown color I was looking for it was time for the final step.
Step 4: Resting the Meat
This may be the most important step in any meat cookery, letting the meat rest. I removed the T-bone from the skillet and set it on a heat-proof plate and rubbed the top with a thick dab of unsalted butter. I set a sheet of foil lightly on top of the meat, not sealing it with the foil but just letting the foil rest on top. Then I set a timer for 10-15 minutes and walked away; I had a glass of wine and left the kitchen while the meat rested.
Whatever you do, do not poke, prod, cut or otherwise molest the meat while it is resting! Just leave it alone!
When meat is cooked under direct heat the juices rise to the outside of the meat. If you cut open the meat without resting it the meat will look dry and almost dull in appearance by the time you get to the halfway point of consuming your portion. If you let the meat rest for the appropriate period of time, the juices have time to redistribute themselves to the center of the meat, ensuring a juicy and perfectly pink interior.
This resting stage can take 5 to 10 minutes for a normal steak, up to 20 minutes for a chicken and 30-45 minutes for a large roast such as a prime rib cut.
If you feel that the meat has cooled too much during the resting process, I have a trick to fixing that. I melt butter until it is very hot and then pour it over the cooled meat, just a tablespoon or two will do the trick. It will warm up the meat just enough and adds so much flavor. If you have ever wondered why the steaks at an expensive steak house taste so good, a lot of it is due to this final application of butter. If you have maitre d’hotel butter then more’s the better (I will post this recipe soon).
When the timer went off I dashed to the kitchen and grabbed my carving knife and voila! Perfectly cooked meat!
Feast your eyes on this perfect steak. It is medium rare throughout the entire cut, a perfect rosy pink and super juicy. You can see the rich fat on this beef T-bone and there is no grey ring or unevenness of any kind. It is a meaty miracle. I was too hungry on Sunday to snap a picture of the pork T-bone but it was pale pink, extremely juicy and tender, everything a perfect chop should be. And I ate it *all*.
This slow roasting cooking method is perfect for apartment dwellers like myself, or for cooking perfect steaks in the dead of winter when grilling outside is not an option.
So don’t be afraid of ruining a whacking great cut of meat like these monster T-bones, it is really foolproof and I guarantee your steak will come out perfectly.
Resources:
4505 Meats
San Francisco Ferry Building
Saturday market between 8 and 2
Thursday market between 10 and 2
Shop online at 4505meat.com
This time of year the pears are coming in from the orchards, beautiful green Comice pears and red shouldered Bartletts, they are so lovely. It’s pear custard tart season!
Did you know that pears do not ripen on the tree? They are one of the few odd fruits that are unripe when picked, then they need a few days of rest on your counter to ripen and transform from rock hard to sweet, tender lusciousness – like avocados!
They can also go from perfect ripeness to a mealy nasty thing if you don’t keep an eye on them, so don’t forget to keep checking them.
At the office we receive a nice fruit CSA every week and all the staff get excited for Fruit Wednesday. I also receive my fruit and veggie box every other week and last week there was an abundance of pears, slowly ripening everywhere.
I mentioned to my colleague that I have an excellent pear tart recipe and perhaps I should make something from the office pears to bring in to work. I also had three perfectly ripened ones from my personal box so my date in the kitchen was set.
I managed to bring home the ripe work pears on the bus without them getting mauled. It was quite the feat, involving bubble wrap and many reprimands to rude bus people who were determined to rest their backpacks on my lap. City life!
Safe in my apartment the pears lounged on the counter while I preheated the oven and assembled the pantry items for a fast and delicious pear custard tart.
Years ago when Martha Stewart’s star was still in the heavens and not yet sullied by federal investigations and various shenanigans her staff published a cute recipe booklet for the grocery store called Everyday Food. My sister gifted a home subscription to mom and me and it had some great little gems like this recipe. They published quite a nice cookbook too, and this recipe is also in that book. My late beau loved this tart so much he would eat at least half of it in one sitting.
The prep for the tart is simple. A tart pan or pie plate gets well buttered and more butter is melted for the filling. For each tart you need three ripe pears, peeled, halved and cored, then sliced thinly and fanned out in the tart pan. I cut up the pears while the butter was melting in the microwave.
For the filling I like to use my immersion blender and my silicon 4-cup measuring cup, but a regular blender is fine or if you have a normal working shoulder you can use a whisk and a bowl. But for me, the immersion blender is the way to go while my stupid shoulder finishes healing.
In the measuring cup I broke open pretty pullet eggs with yolks the color of marigolds, gorgeous! The rest of the filling ingredients went in the container in no particular order: sugar, salt, vanilla, melted butter, flour, milk. A quick blitz with the blender until smooth and voila! Done!
I poured the filling over the pears and slid the tart pans in the oven for 40 minutes. In no time my pad started to smell really good, heady scents on vanilla and sugar and the sweet fragrance of pears, ahh, I could hardly stand it.
When the timer went off I peeked in the oven and the tarts were gorgeous, puffed and golden on top and the center was set. While they cooled I had an aromatherapy moment, inhaling deeply.
(one for me, one for the office)
After the pear custard tarts had cooled I showered them with powdered sugar, a blizzard of sugar to mimic the monsoon pounding against the window. Rain! In early October? Seattle, are you missing some weather?
I wrapped one up to take to the office, tucked away in my silly butterfly-patterend farmers market bag to keep it dry, and again braved the bus.
My colleague and I had a slice of the pear custard tart with our morning coffee while the storm whirled by outside. Suddenly the sun broke through lightening up our workspace to match the pleasure of eating such a lovely tart for breakfast.
Pear Custard Tart
3 ripe pears
3 eggs
1/2 stick of melted unsalted butter (1/4 cup)
2 tsp vanilla
1/4 tsp salt
1/3 c sugar
1/3 c flour
3/4 c whole milk
more butter for buttering the tart pan
powdered sugar
Preheat the oven to 350 F. Butter a tart pan or pie plate. Peel and core the pears, and slice thinly vertically (top to bottom) and fan out the slices in the tart pan. (note: you can also use canned pears!)
In a blender add everything else (except the powdered sugar) and blend until smooth.
Bake 40-45 minutes until the top is golden brown and the center is set. It will be puffed but will deflate slightly as it cools.
Dust with powdered sugar and serve warm, room temperature or chilled.
Makes 4 slices. Realistically it could serve up to 8 but I have never met anyone who did not want their full quarter!
One of my favorite things to make in the spring is a vegetable soup with a dollop of pistou, a country French type of pesto using tomato, garlic, basil and cheese.
Pistou is a zap of flavor, a bold hit of color and a zing to the tastebuds and an essential part of the spring menu.
This spring, however, my ability to use the mortar and pestle was out of whack, and so was using a knife so I had to miss my annual ritual. However, this summer, it has finally warmed up enough in the outlying boroughs to permit ripening of tomatoes. Yay! Tomatoes!
My CSA box has been overflowing with tomatoes and yesterday I was pondering what to make for dinner that would be simple and help me use up my bounty. I thought of pistou over pasta. And, given I am still not up to mortar work, I thought of making pistou in my food processor.
My dinner was ready in 10 minutes and it was fantastic.
I had the great luxury to use some incredible local goat cheese from Achadinha Farm. Donna Pacheco is an incredible craftsman and her aged goat cheese is heady stuff. I was lucky enough to catch the staff at their stall at the end of the day and since they were packing up I got a tiny deal on a nice wedge of Capricious. It’s interesting stuff, contrary to intuition you are not supposed to refrigerate it! I like using it in lieu of Parmesan or serve it in rough chunks on a cheese plate or grated over vegetables or eggs. It’s a little luxury.
(
(keep the Capricious in waxed paper on the counter – not in the fridge!)
But last night I decided to get splurgy and use it in my pistou and I think I will never use Parmesan again.
Although using a food processor and aged goat cheese are quite non-traditional for a pistou I can heartily endorse their use.
While the pasta water was heating, I peeled some garlic and minced in the food processor. Then, I added a cup of the Capricious cheese, broken into small chunks and pulsed until the cheese was well ground. Next in went a medium-zized bunch of basil and when it was smoothly ground I tossed in a small tomato. The processor whizzed away turning the normal pesto-green ingredients into an incredible sunset hue. My tomato was a pink/golden heirloom variety and I added it “seeds, peel and all”. After scraping the bowl and adding a bit of salt and pepper I thinned out the pistou with a small slug of olive oil and, voila! Pistou in 2 minutes.
I dressed the drained spaghetti with the pistou and let it heat gently in the saucepan to mellow the raw garlic a little. Mounded in a warm bowl the pasta coated with pistou glowed with warmth and flavor. I perched on my chair and slurped away and watched Casablanca feeling rather content with life.
HAL’s Pistou
5 cloves of garlic
1/2 c Parmesan or other aged dry cheese (I used Capricious by Achadinha in Marin)
1 bunch of basil (or 2 cups packed leaves)
1 small tomato
1/2 tsp salt or to taste (depending upon how salty the cheese is)
a few grinds of black pepper
2 T extra virgin olive oil
In a food processor, blend the garlic, then add the cheese and pulse until smooth. Add the basil and pulse until the leaves are finely pureed. With the motor running add the tomato and puree until smooth. Taste for salt and add if needed, add pepper. With the machine running add olive oil to make a loose paste, like the consistency of jam or sour cream.
Serve in vegetable soups, dressed over cooked pasta, spread on bread in lieu of mayonnaise or drizzled over cooked vegetables.


